| English | Deutsch | 한국어 |
This writeup is out of date and contains no info from after the countdown ended on Thursday 2020-11-05 18:00 UTC. I will be adding a writeup of these steps in the time to come.
Destiny 2: Beyond Light ARG
What we know so far.
The Collector’s Edition (CE) of Beyond Light contains the following items: a bag, a canteen, a soundtrack (digital), a sticker, a postcard, a letter/report, a “mysterious logbook” and a statue of a pyramid ship.
Out of these, we have found things of interest on the postcard, the letter/report, the pyramid and the logbook.
High res images and PDFs exist here (Google Drive), courtesy of Bachmanetti (Twitter, Reddit).
In case you are only here for the emblem codes, here they are:
7LV-GTK-T7JJYN-JAA-Y7DRA9-XPH-6KJ
Go redeem them at bungie.net/redeem. If you want to know how they were found, read on!
Table of Contents
Things of Interest
The Pyramid Statue
Officially called “The Splinter” in the guide explaining how it works, the statue has four modes: On, Breathe, Code, Off. In Code mode, it blinks in a repeating pattern of about a minute, with a combination of short, long and pulsating blinks. This code has been cracked, see The Code From the Pyramid.
The Postcard
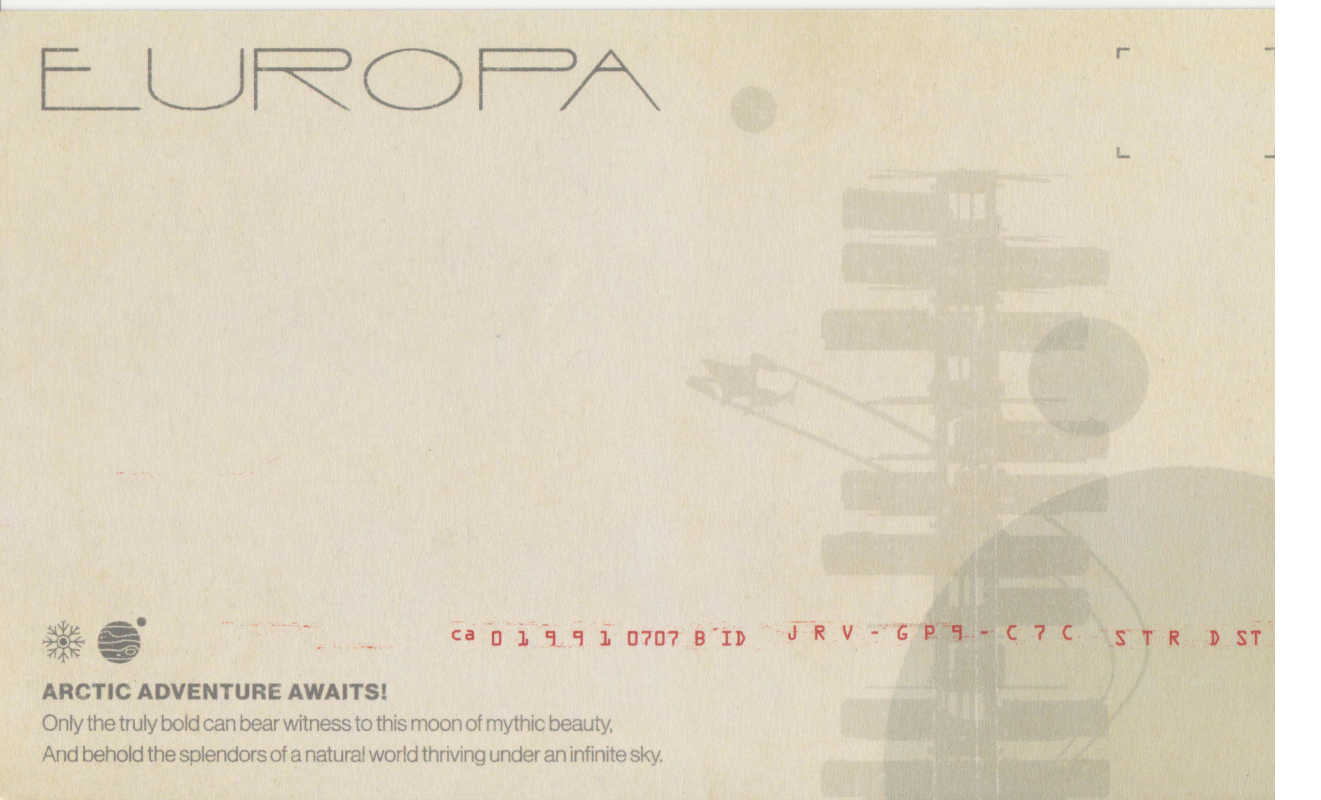
Image credit: Bachmanetti (Twitter, Reddit). Screenshot from page 2 of original PDF.
The postcard contains a line of red text containing the following three parts: ca 0 1 9 9 1 0707 B´ID, N N N - N N N - N N N, S T R D ST
The first and third part are equal on all postcards. The second part is unique for each postcard, and is an emblem code that can be redeemed for an emblem at bungie.net/redeem. THE CODE IS UNIQUE AND USABLE ONCE ONLY! DO NOT SHARE YOURS WITH OTHERS BEFORE YOU HAVE REDEEMED IT!
The first part seems to be a reference to Bungie itself (The company was started in 1991, and 0707 (July 7) is Bungie Day).
The third part seems to be a reference to “Stardust”, which has been rumoured to be an internal codename, first for Season of Arrivals, then for Beyond Light. Its appearance here seems to support the latter. May also be an allusion to the seeming fact that The Nine have an interest in Europa (as detailed in The Letter/Vanguard Report).
See the entire thing here (Google Drive, courtesy of Bachmanetti).
The Letter
The letter is twofold: a report to the Vanguard by “CHA-319” regarding the ban on traveling to Europa, and a handwritten letter on the back. The letter references Clovis Bray as “my grandfather”, and is signed “Your stranger I remain, E”. This confirms that the Exo Stranger is Elsie Bray, as we have suspected for a while now.
Read the entire letter/report here (Google Drive, courtesy of Bachmanetti).
The Logbook
The logbook is 46 pages long and details Clovis Bray’s exploration of Europa and work on Exos. It contains a ton of puzzles and lore, as well as some letters to and from his grandchildren: Elsie, Ana and Willa. Hot damn is this a read. I recommend looking through it all. So far all the puzzles we have found came from within this logbook, and there are probably more because there are so many cryptic images in here.
Read the entire logbook as PDF here (Google Drive, courtesy of Bachmanetti).
All text from the logbook also exists here (Google Docs), courtesy of Eruke (Eruke#7280 on Discord). It is all copypastable, and well formatted!
The Solutions
There are several puzzles. Most are found in the logbook, so far. We have solved some.
The Code from the Pyramid
The solution to this mystery can be found by combining the blinking of the pyramid on Code mode with the table on Page 1.
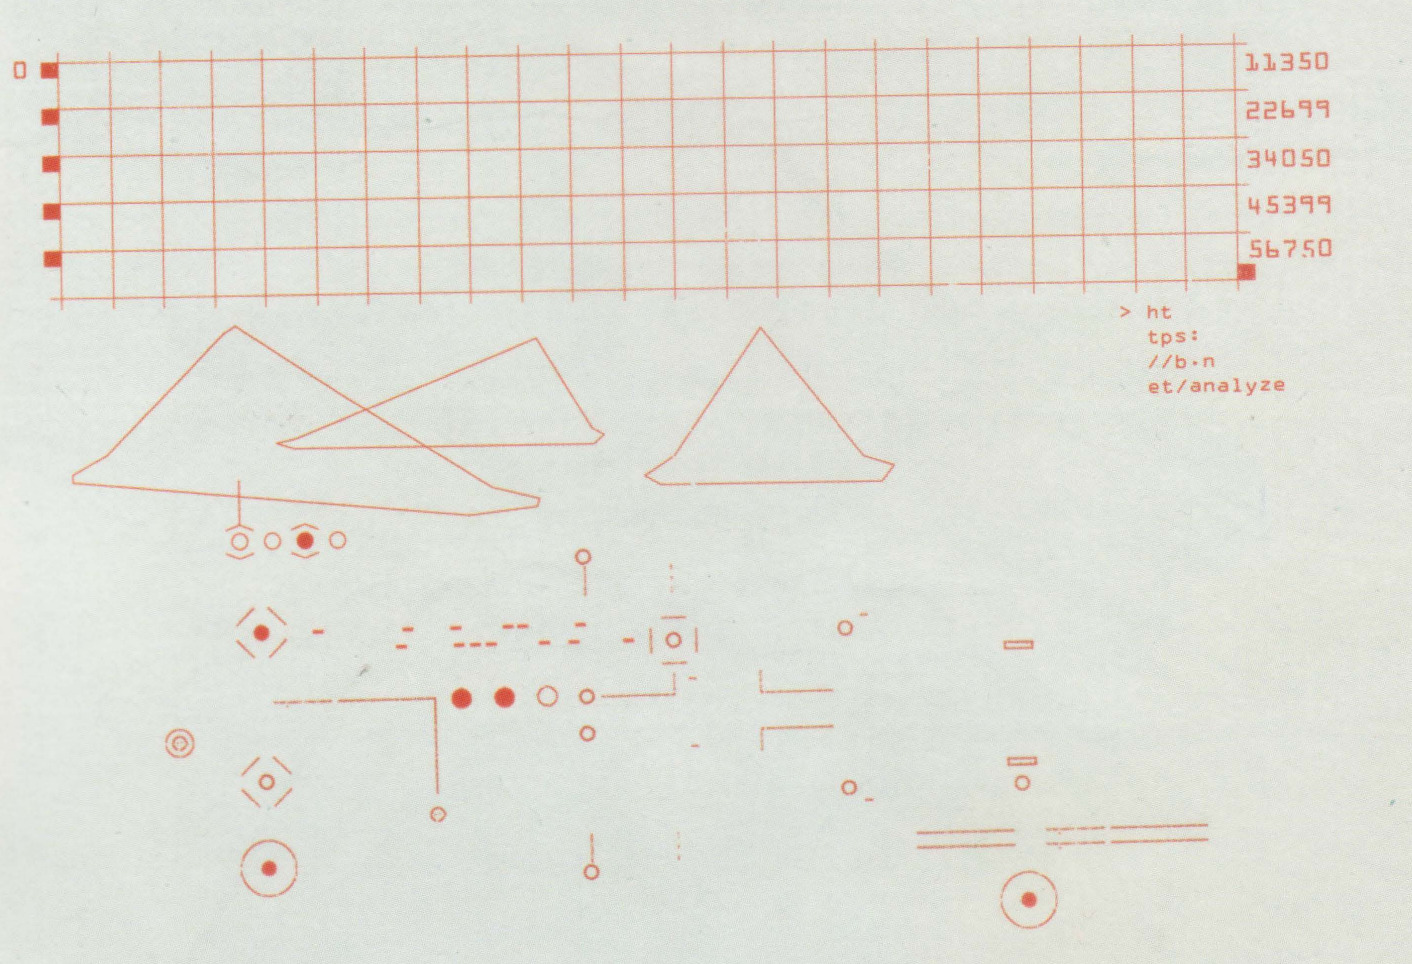
Image credit: Bachmanetti (Twitter, Reddit). Screenshot from page 2 of original PDF.
To the left of the first row of the table is the number 0. To the right of the table, one on each row, we find the following numbers:
11350
22699
34050
45399
56750
Additionally, underneath the table, we see three outline drawings of The Splinter. Pointing to one of these, conspicuously in the same place as the on-button of the statue, is a sequence of four dots. The third of these dots is filled. Remember that the third mode of the Splinter is the Code mode, which means that the Splinter is likely a part of the solution to this puzzle!
Here is a 63 second video of the Splinter blinking, courtesy of Melmsie (Twitter). Note the softer “pulsing” blinks that appear about every 11 seconds.
Bachmanetti figured out that the numbers to the left of the table are timestamps (in milliseconds), and that they correspond with the pulsing type of blinking. Dividing the milliseconds by the amount of columns (for instance, 11350 ms / 23 columns ≈ 500 ms/col ), we find that each cell in the table roughly corresponds to half a second. If we jump half a second at a time on the video and fill the cells that correspond to a lit shard, we get the following result:

Image credit: Dzho (Dzho#1101 on Discord), original
This spells out CHOOSE. (Dzho actually noticed the split into five sequences and made this image before Bachmanetti realized the numbers are timestamps)
There is a hint about where we can use this code, too. Underneath the table is the following text:
> ht
  tps:
  //b.n
  et/analyze
This is easily understood as https://bungie.net/analyze, which indeed is a webpage that contains a code entry field.
To fill in the code, one must be logged in to Bungie.net and have redeemed one of the CE postcard codes (in essence, you must be an owner of the CE). If you do this (and wait a bit for the sync to update your permissions in the background somewhere), then entering “CHOOSE” into the field will give you a screen like the following:
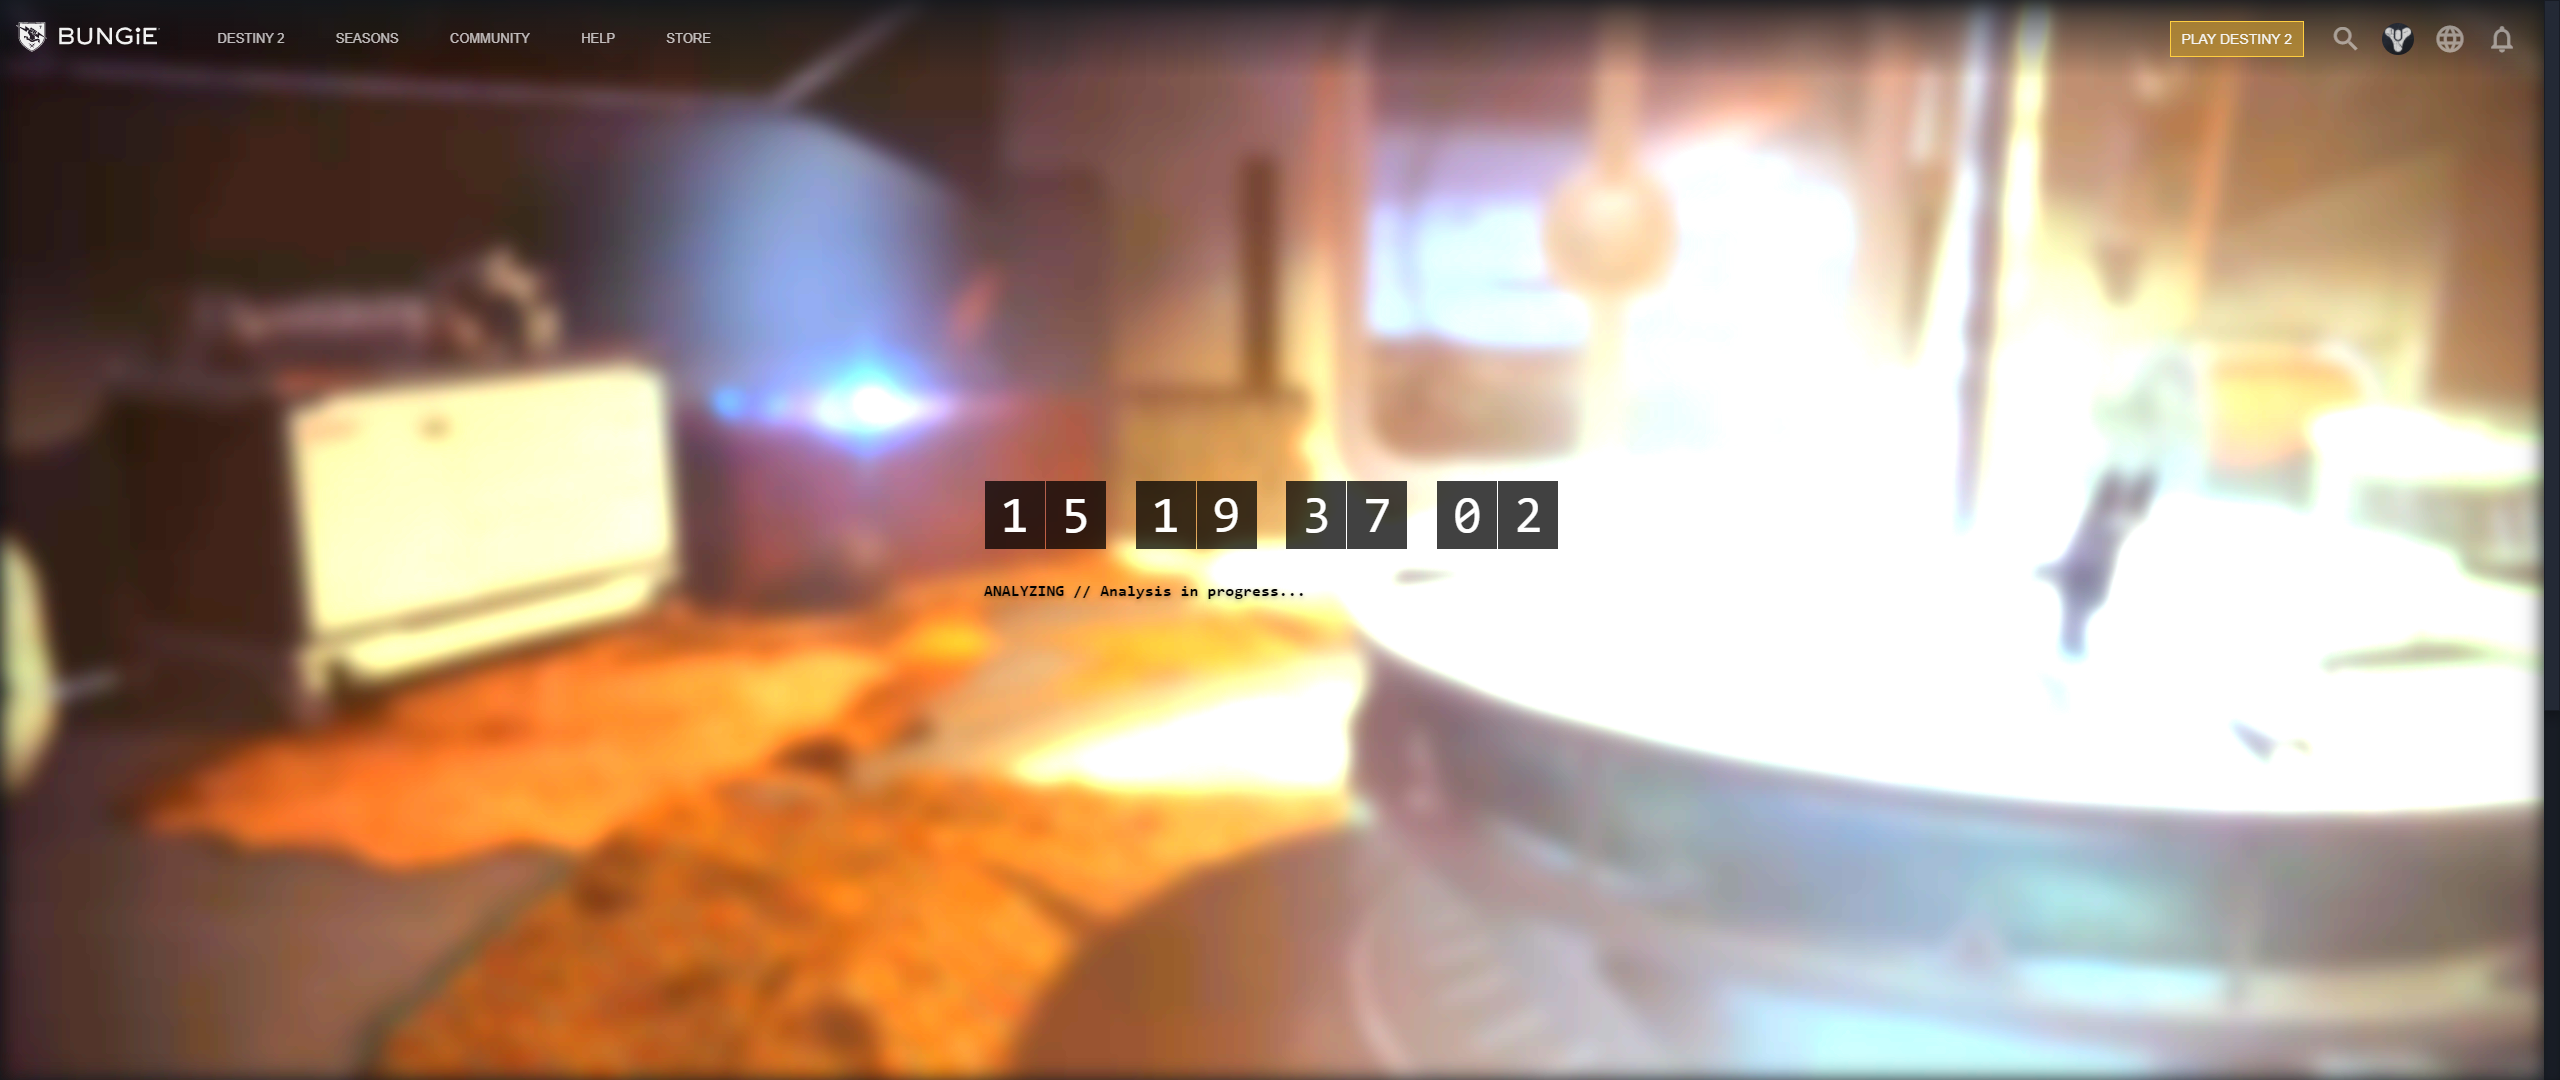
Image courtesy: Myrzir (Myrzir#0934 on Discord), original
This is a countdown, specifically counting down to Thursday Nov 5 at 11 AM PDT (18:00 UTC, one hour after reset). This seems to be a countdown. If you are a CE owner, check back on the page after the countdown ends! Chances are this will be the start of the ARG proper, and that we will get instructions for the next step on this page.
NOTE: The page doesn’t seem to work properly on mobile. If you are having trouble, try entering the code using another browser or from a computer.
Emblem Codes
Most of the puzzles so far have resulted in emblem codes. There is also one emblem code that is unique to owners of the CE.
(CE Owners Only) The postcard
There is a code printed on the postcard which is single use and unique for each postcard. It can be redeemed on bungie.net/redeem. See The Postcard for how to find the code.
(Everyone) The Tube/Rod Puzzle
There are tubes/rods on pages 16 and 27 in the logbook. Page 16 contains the following:
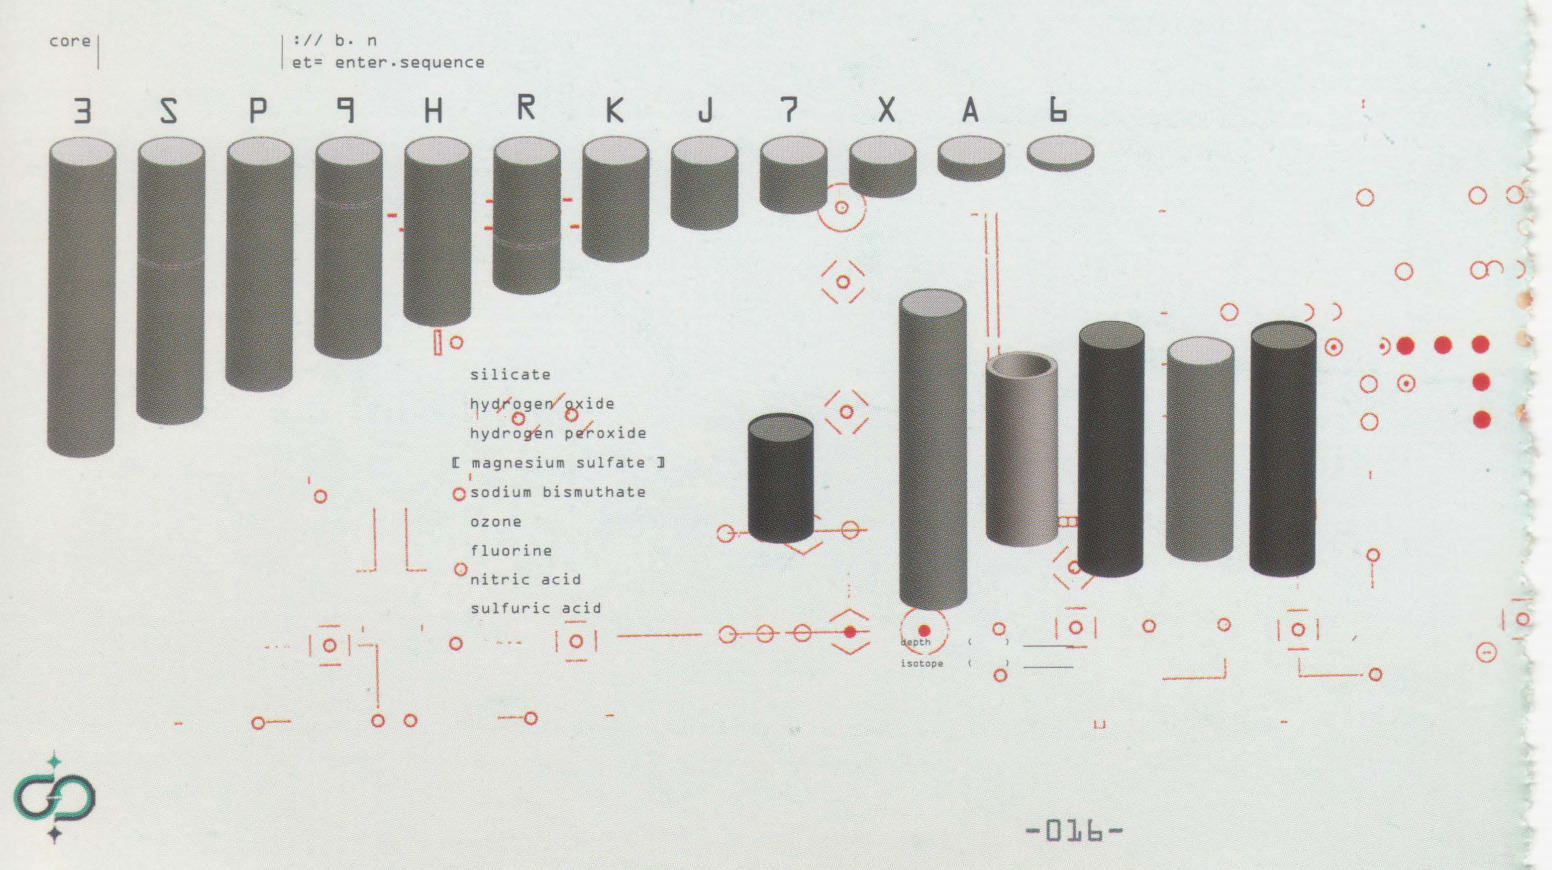
Image credit: Bachmanetti (Twitter, Reddit). Screenshot from page 16 of original PDF.
Page 27 contains the following:

Image credit: Bachmanetti (Twitter, Reddit). Screenshot from page 27 of original PDF.
The rods on page 27 are each comprised of several smaller rods. If we use the legend from page 16 to translate to letters, we get the following three sequences:
67S6K99
37XP7AJ7X6J
RA9XPH6KJ
There is an arrow pointing at the rightmost rod, and the code is indeed 9 characters long: RA9-XPH-6KJ. This is an emblem code, redeem it at bungie.net/redeem!
(Everyone) The Dot Letter Puzzle
On page 28 of the logbook, we find the following configuration:
Image credit: Bachmanetti (Twitter, Reddit). Screenshot from page 28 of original PDF.
On page 12, we find the same dot configuration, but without the letters:
Image credit: Bachmanetti (Twitter, Reddit). Screenshot from page 12 of original PDF.
However, the dot pattern on page 12 has a line going through it! If we start in the hollowed out dot and follow the line to the end, noting down letters as we pass through their corresponding node, we get the following sequence: JYNJAAY7D. This is 9 characters! Go ahead and redeem JYN-JAA-Y7D at bungie.net/redeem.
(Everyone) The Graph Puzzle
Page 39 of the logbook contains the following graph:
Image credit: Bachmanetti (Twitter, Reddit). Screenshot from page 39 of original PDF.
The Y axis is labled 0 at the bottom and Z at the top. The axis has 36 marks, which corresponds to 0-9 and A-Z. If we mark the axis like this, counting upwards like 012...89ABC...YZ, and mark down the points on the graph line from left to right, you get the following Y-indices: 7 21 31 16 29 20 29 7 19, which correspond to the string 7LVGTKT7J (10 is A, 11 is B, and so on). This code is 9 characters long! We can redeem 7LV-GTK-T7J at bungie.net/redeem.
The Unsolved Mysteries
As you have probably gathered, there are probably more puzzles hidden here. There are patterns in the screenshots above I have not mentioned, and many more elsewhere in the logbook. What do they mean? We don’t know! Come to the #beyond-light-arg channel on the RaidSecrets Discord if you are interested in helping out with finding and solving them!
I am also a part of the Corridor Crunch discord, where we made a crowdsourcing engine for the Corridors of Time puzzle. We want to do the same for this ARG, and to gather puzzle enthusiasts on our Discord channel. If you are interested in helping with the crowdsourcing, development or puzzling, join us!
The Dead Ends
We’ve looked so diligently we even found mysteries where there were none. I list them here.
4K Background Maze/Game of Life
Someone noticed a weird maze-like structure in the upper left hand corner of the following image:
Image credit: Bungie. Original.
It was theorized that this might have something to do with Conway’s Game of Life. However, Cozmo confirmed on Reddit that this is just an image compression artefact.